
A warning that says “Five viruses found,” “Your subscription expired,” or “Your bank account is infected” may look like an antivirus alert even when it is only a website notification. The clue is that it keeps returning after the original tab is gone, often with a browser icon or a small website name in the notification.
This is usually a permission problem, not proof of a systemwide infection. A deceptive page persuaded the browser to accept notifications and now uses that legitimate feature to send false emergencies. Do not click the warning to make it stop. Remove the website’s permission from browser settings, then check whether anything else was installed or exposed.
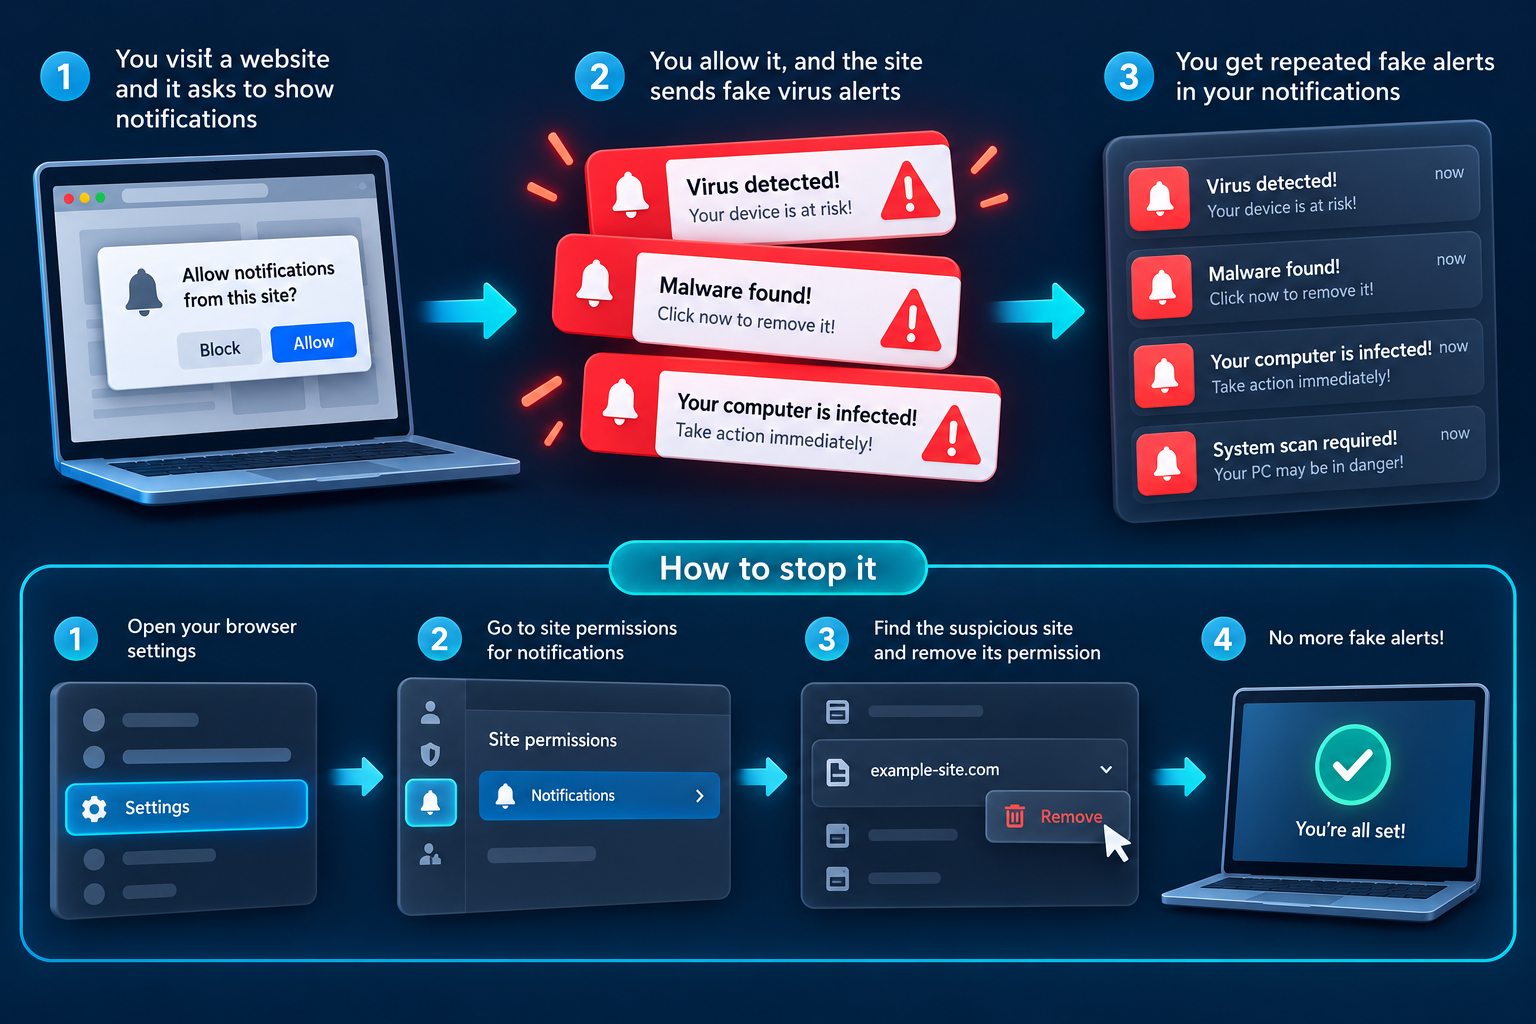
First identify what is actually producing the alert
There are four different things people often call a pop-up:
- Webpage dialog: visible only inside the current tab.
- Browser pop-up or redirect: opens another tab or window while browsing.
- Website push notification: appears through the browser’s notification system, sometimes after the site or browser is closed.
- App or operating-system alert: produced by installed software or the device’s security system.
The fix depends on the source. Blocking pop-up windows does not automatically revoke website notifications. Turning off every operating-system notification may hide the symptom without removing the site’s permission.
What a fake virus notification is trying to make you do
The alert is usually a doorway to a second action. It may ask you to:
- call a fake technical-support number;
- install a “cleaner,” browser extension, or remote-support app;
- renew a security subscription on an imitation payment page;
- enter an email password or card number;
- allow another permission;
- visit an advertising or affiliate page.
A browser notification cannot scan every file on the device and produce a reliable infection count merely because a site was allowed to send messages. Treat dramatic numbers, countdowns, sirens, official-looking logos, and threats of data loss as persuasion, not diagnosis.
Do not click the notification—even to close the warning
Use the notification’s ordinary dismiss control or open the device’s notification settings. Clicking its body can open the attacker’s page and restart the pressure sequence. Do not call the displayed number. A fake technician may ask for remote access, payment, account credentials, or a verification code.
If the notification contains a familiar security-company name, open that company’s installed application directly and check its status. A logo in a notification does not prove which company sent it.
Chrome on a computer: block the sending website
In Chrome, open Settings through the browser menu. Go to Privacy and security, Site settings, and Notifications. Review the sites allowed to send notifications. Find the unfamiliar or deceptive site and choose Block or Remove according to the current menu.
Blocking prevents the site from sending notifications and from requesting the same permission in the ordinary way. Removing may return it to the default state so it can ask again. When the site is clearly deceptive, Block is the stronger choice.
If you are already on a trusted site whose permission you want to change, use the site-information control near the address bar and set Notifications to Block. Do not revisit a known malicious site solely to reach that control; use the full settings list instead.
Chrome on Android: check site notifications and app notifications
Open Chrome, then Settings, Site settings, and Notifications. Find and block the site. Google’s current Android instructions also allow permission changes from a site’s information panel, but the settings list is safer when you do not want to reopen the page.
If the browser has been silenced at the Android app level, the alerts may disappear while the underlying site remains allowed. Re-enable Chrome notifications temporarily only if necessary to identify and manage legitimate categories, then review the website permissions. The goal is to block the sender, not to lose useful notifications from every trusted site.
Microsoft Edge: remove or block the website
In Edge, open Settings and go to Privacy, search, and services, then Site permissions and All sites. Select the site and set Notifications to Block. Microsoft notes that Edge website notifications can appear even when Edge is closed, which is why closing every browser window may not end them.
Pop-ups are a separate Edge setting. If new tabs also open during browsing, review Pop-ups and redirects after blocking the notification sender.
Firefox: review notification permissions
Open Firefox Settings and go to Privacy & Security. Under Permissions, open the settings for Notifications. Select the site and choose Block or remove its permission, then save the change. Mozilla’s current instructions distinguish removing permission—which can allow a future request—from explicitly blocking the site.
Firefox can also block new requests asking to allow notifications. That reduces interruption, but you can still create exceptions for services you intentionally use.
Safari on a Mac: change both Safari and system notification settings
In Safari, open Settings, choose Websites, then Notifications. Deny the website and remove permission where appropriate. On current macOS versions, websites and Safari web apps can also appear in System Settings under Notifications. Turn off Allow Notifications for the website there if necessary.
Apple’s Safari guidance separates denying a website in Safari from changing how its alerts appear in macOS. Review both places when the site still appears in Notification Center.
What about Safari on an iPhone or another browser?
Mobile behavior changes by operating-system and browser version. Review the browser or installed web app in the phone’s notification settings, then review website permissions inside the browser where available. Remove unfamiliar web apps from the Home Screen if you installed one through a deceptive prompt.
Use the current help page for your browser and platform. Do not install a third-party “notification remover” advertised by the alert.
Find the responsible browser profile
One computer can have several Chrome, Edge, Firefox, or Safari profiles. A notification permission belongs to the profile that granted it. If the suspicious site is absent from the settings you first check, look at the icon or profile name on the notification and review every browser profile that is allowed to send system notifications.
Work and personal profiles may synchronize settings separately. Do not delete an employer-managed profile to solve a notification problem. Capture the site name and contact the administrator, who may be able to remove the permission through policy and inspect whether other users were affected.
Guest profiles and private windows normally handle permissions differently, but do not rely on that general rule to identify the source. The browser’s current permission list and the operating system’s notification sender are better evidence.
Separate a fake alert from a real security product
Open the installed security product from the Start menu, Applications folder, or verified system setting—not from the alert. Review its protection history. A genuine detection should identify a file, process, website, or action inside the product. Compare the time and threat name with the notification.
If the product has no matching record and the notification names an unfamiliar website, abusive web push is the more likely explanation. If there is a matching detection, follow the security product’s documented quarantine or removal process. Do not restore a detected file merely because a website says the antivirus made a mistake.
After blocking the site, check what else happened
If you only allowed notifications and did nothing else, revoking that permission may resolve the incident. If you interacted further, review the deepest action:
- Downloaded but did not open a file: remove it without opening it.
- Installed an extension: remove it from the browser’s extension manager and review other extensions.
- Installed an app or profile: stop using the device for sensitive work and follow the platform’s removal and security-scan guidance.
- Entered a password: change it from a trusted device, end unknown sessions, and review recovery methods.
- Allowed remote access: uninstall the remote-control software, revoke unattended access, and secure accounts used during the session.
- Paid or entered card details: contact the bank or card issuer through a verified route.
The suspicious-link recovery guide gives a fuller response by interaction level.
Run a legitimate security check
Update the operating system, browser, and installed security software from their own settings. Run the built-in or trusted security scan. On Windows, Windows Security provides quick, full, and offline scan options. On Android, keep Google Play Protect enabled and review recently installed apps.
A clean scan supports the conclusion that the problem was notification permission, but no consumer scan guarantees that every possible threat is absent. Persistent device control, unknown installations, or high-value work data justify help from an IT or security professional.
If the notification returns
Check these possibilities one at a time:
- another website also has notification permission;
- a different browser or browser profile is sending it;
- a web app is installed separately;
- the alert is an app notification, not a website notification;
- a browser extension changed startup or search behavior;
- the site was removed rather than blocked and permission was granted again;
- browser synchronization restored a setting or extension on another device.
Use the small browser or site label in the notification to identify the sender. Take a screenshot before dismissing it if the label disappears quickly, but redact personal details before sharing.
Why clearing history may not fix it
Browsing history, cookies, cached files, site permissions, extensions, and push subscriptions are separate controls. A general history cleanup may leave notification permission intact. Reinstalling the browser can also restore synchronized settings when you sign in again.
Target the permission first. Clear site data if needed, then review extensions and synchronization if the behavior persists.
Prevent the next deceptive prompt
- Choose Block when an unfamiliar site asks to send notifications.
- Do not click “Allow” because a page says it is required to prove you are human, start a download, watch a video, or close an advertisement.
- Disable new notification requests globally if you never use website alerts.
- Keep only the trusted sites whose alerts provide real value.
- Teach family members that the browser permission box is separate from the page’s instructions.
A real site can explain why notifications are useful without threatening you or making permission a condition for leaving the page.
A diagnostic shortcut
If an alarming message appears outside the tab, includes a browser or website label, and disappears after you block that site’s notification permission, the incident was most likely abusive web push. If alerts continue from another source, or if software was installed, expand the investigation. The wording of the warning is designed to capture attention; the sender label and permission list are the useful evidence.
Record which setting solved the problem so you can distinguish the same symptom from a genuine app or system warning in the future.